We were fortunate to have an old TaeKwonDo uniform to use. I couldn't find any online that were green, so we took Joey's old white one and bought some green fabric dye I got at Walmart (I think the brand was Tulip and it comes in the little packets of powder) and dyed it a couple times to get a good shade.
I hung it on a step ladder in the garage to dry. Then my husband brought home some fabric paint tubes for the details.
I needed the diamonds with the crosses in the middle, so I made a diamond stencil for myself to keep them uniform and evenly spaced.
There's a folder inside the jacket to keep the paint from bleeding through and sticking the front and back of the fabric together.
Then I just pained on the the diamonds with the metallic silver fabric paint and the little paint brush supplied.
Then, after the silver dried, I used the black paint to paint on the crosses in the center of the diamonds. (The wet spot is my attempt to clean up a spilled paint drop.)
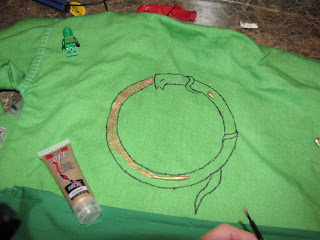
The back was harder because I have no natural drawing ability. I searched for the design that is on the Green Ninja's back, the golden snake, but couldn't find one online to print out and use as a stencil. So I had to use Word Paint (I think) to create a circle within a circle, and then free-draw the snake head in the program, along with the snake tail wraps.
Then I printed it out the size I wanted, and used a seam-ripper to trace around the design leaving a "stencil" for me to trace. I used a black permanent marker to draw it on the fabric.
Then I just used the gold paint from the pack to fill in the snake.
Then I needed to put more diamonds with black crosses on the back.
Then I put the diamonds with black crosses on the pants. I started a little low because the jacket comes down low on my son's uniform, so I didn't see the point in painting on some that wouldn't never show.
Then I put it on like the ninja-mask instructions said (inside out and upside down, with his face looking out the neck hole) and tied the sleeves behind his head, folded the "tag" under and inside, and pulled it up over his nose. And pulled the top down to his brows and folded the seam under. Then I did a quick freehand draw while it was on his head, about how and where the design should go. (I should have made a stencil or printed it offline if it was available, I am horrible at freehand!)
We let it dry. (I did this part on the night before Halloween, I think.)
We had purchased the black double sword and holder from the Spirit Halloween store, along with the ninja gloves. My husband and son made the golden weapon from a wooden dowel painted gold and plastic sword ends screwed onto the ends.
I used one of my sweater belts to wrap around him and a piece of foil wrapped around the knot to mimic the Green Ninja's buckle.
My very picky son was extremely happy with the results!
I hope this helps someone else from searching online for hours trying to find help or something similar to purchase (in stock).


